
Med CPD – Job Posting Guide
July 27, 2026
Overview
This guide helps Med CPD Job Providers create clear, professional job listings that are easier for healthcare professionals to find, understand, and act on.
Med CPD job listings are designed to help healthcare organisations present roles in a structured, profession-specific way. By completing each section carefully, your listing can be easier for relevant healthcare professionals to discover, assess, and apply for.
This guide follows the same general order as the Med CPD job posting form, so you can work through each section step by step.
Use this guide to:
– Create a professional healthcare job listing
– Improve visibility to relevant healthcare professionals
– Help applicants quickly understand whether the role is suitable
– Add clear role, location, pay, and application information
– Use restrictions and targeting settings appropriately
– Save jobs as drafts or publish them when ready
What Makes a Strong Med CPD Job Listing?
A strong Med CPD job listing should help healthcare professionals quickly understand:
– What the role is
– Who the role is suitable for
– Where the role is located
– Whether the role is full-time, part-time, locum, casual, contract, hybrid, remote, or on-site
– What registration, qualifications, or experience are required
– What makes the opportunity worth considering
– How to apply
The goal is not only to increase views. The goal is to help the right healthcare professionals identify relevant opportunities and make informed decisions.
A clear, structured listing can improve applicant fit, reduce avoidable enquiries, and present your organisation more professionally.
Creating a Job Posting (Step-by-Step)
Step 1: Open the Job Posting Page
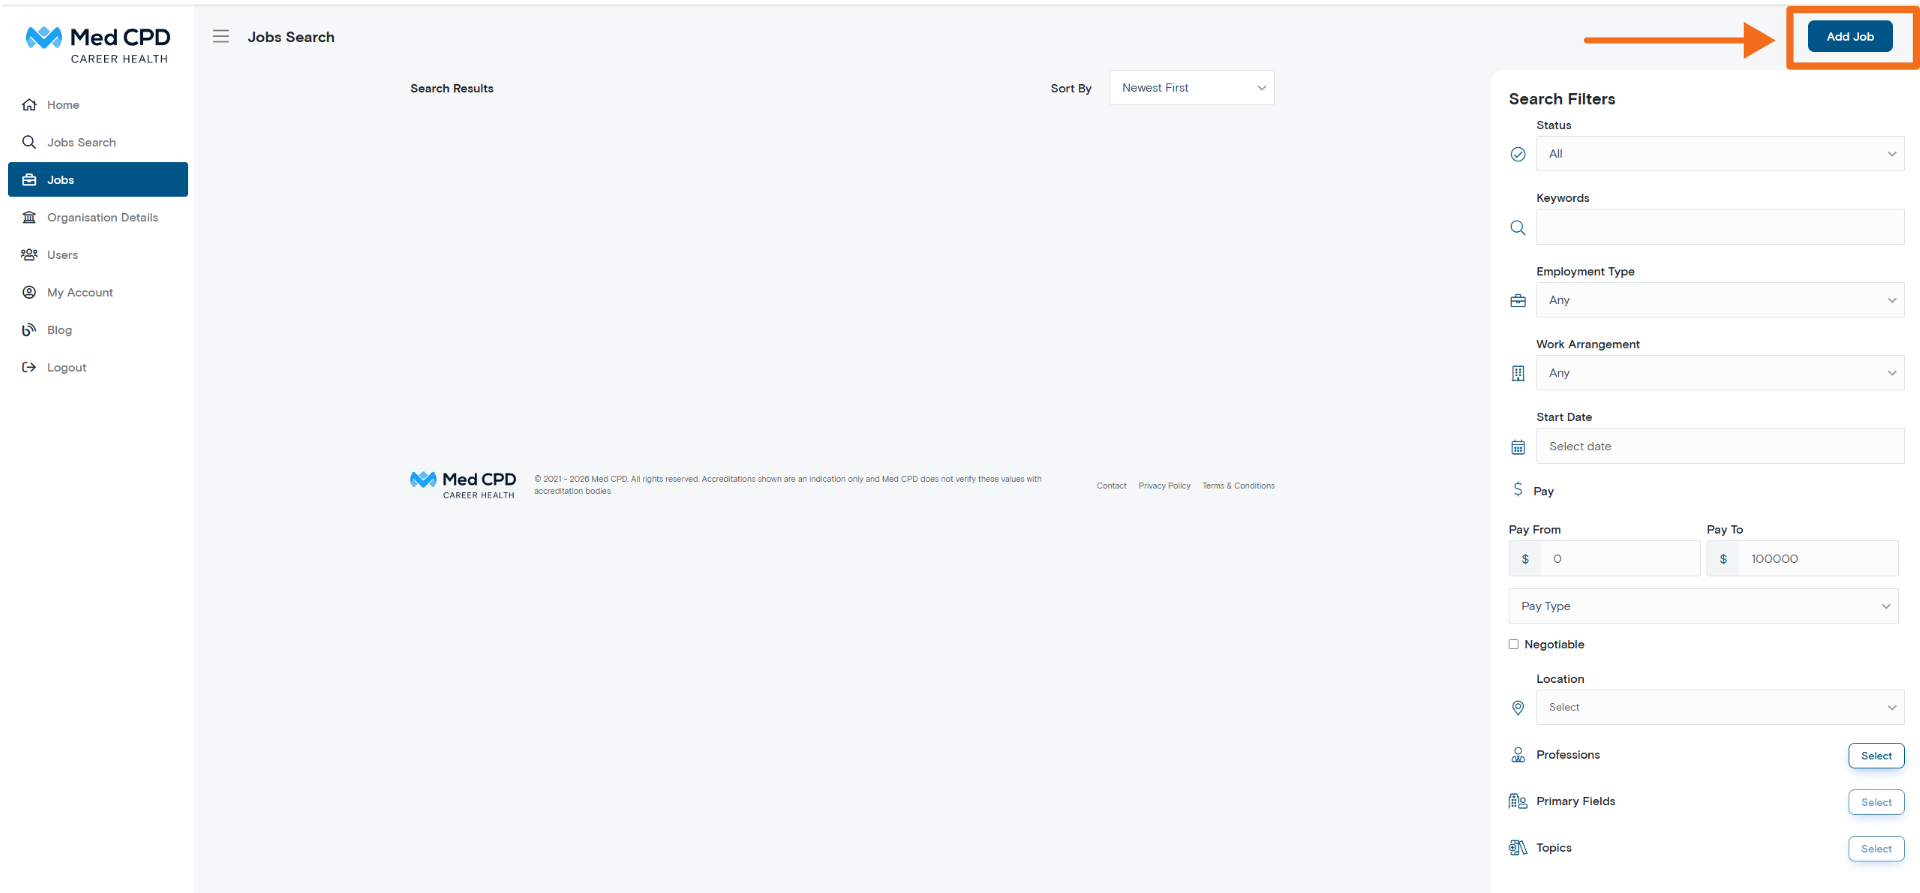
Navigate to the Jobs section within your Med CPD provider dashboard.
Select Add Job in the top right of the page.
Step 2: Create the Job Listing
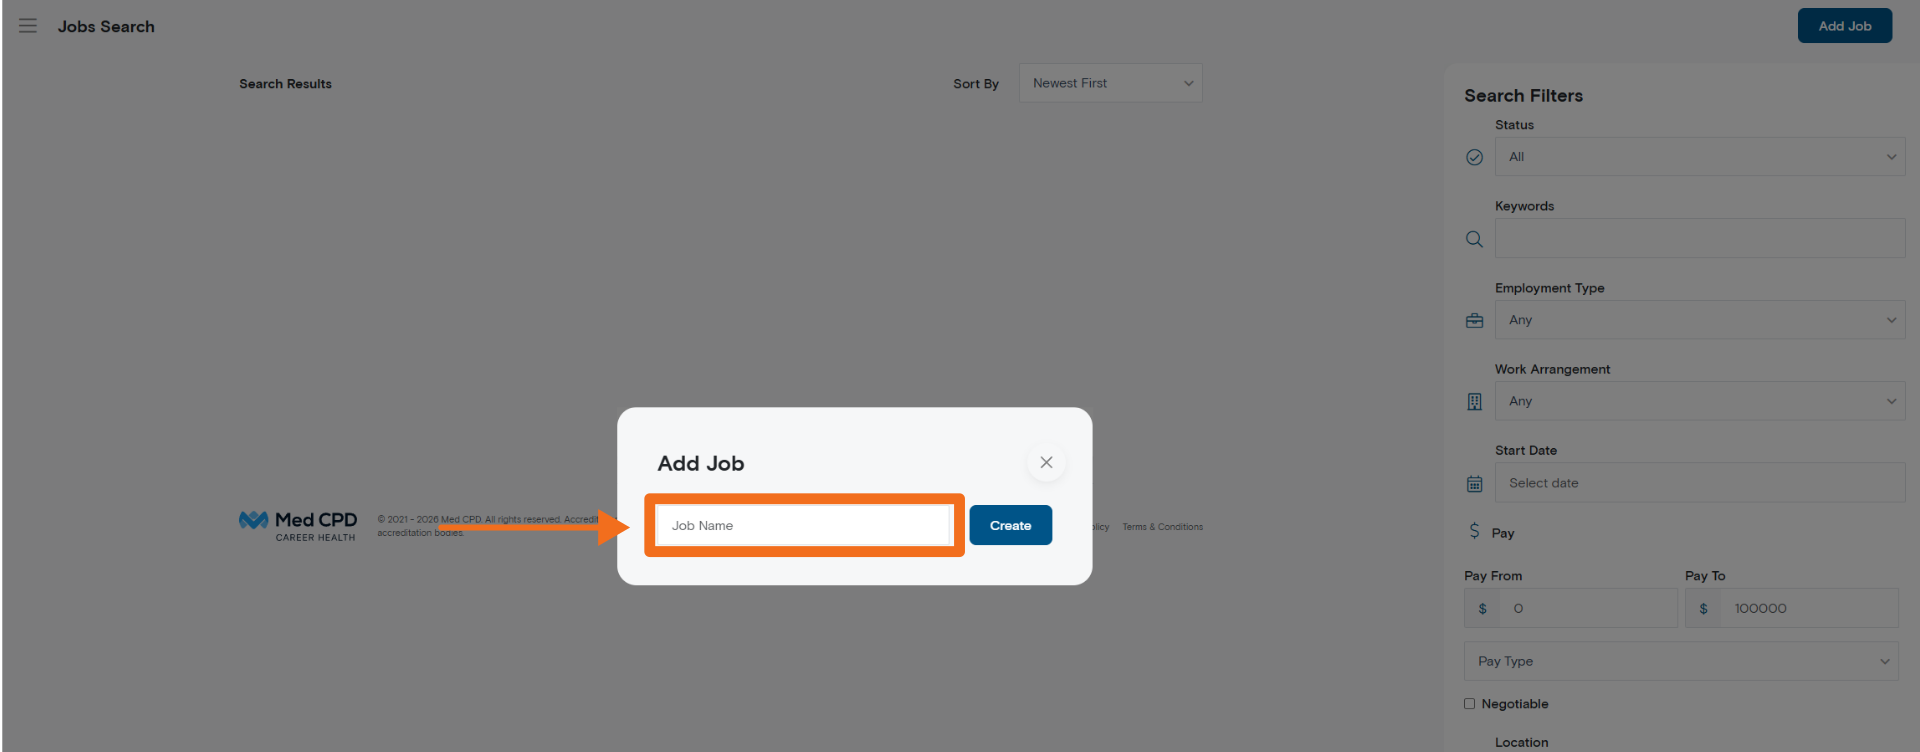
Enter the Job Name.
The Job Name is the title healthcare professionals will see in job listings and search results. Choose a title that is clear, specific, and easy to understand.
A good job title helps users quickly identify whether the role is relevant to their profession, location, and career stage.
Best Practice Tips
Use specific titles such as:
– General Practitioner – Mixed Billing Clinic, Adelaide
– Registered Nurse – Emergency Department, Brisbane
– Physiotherapist – Private Practice, Melbourne
– Pharmacist – Community Pharmacy, Regional NSW
– Mental Health Clinician – Hybrid Role
Avoid vague titles such as:
– Hiring Now
– Great Opportunity
– Medical Role
– Join Our Team
Once you have entered the job name, select Create.
Step 3: Add Core Role Information
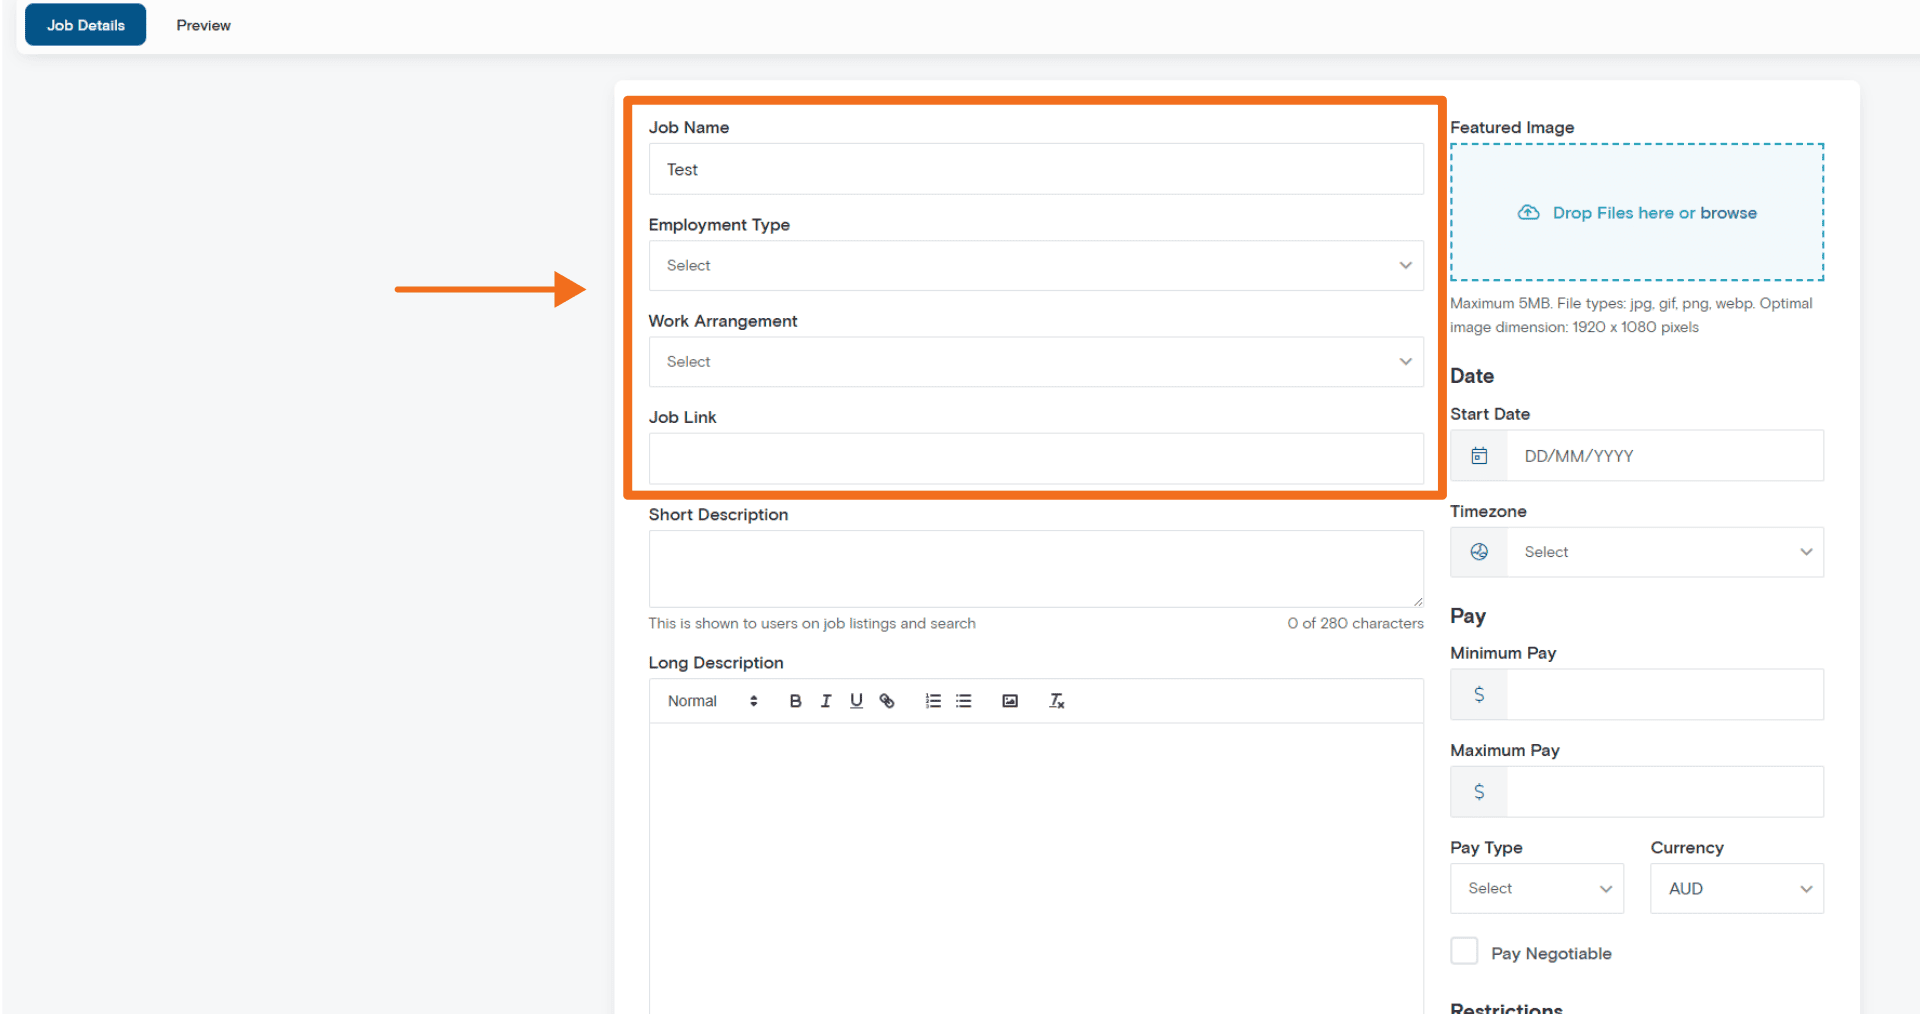
Complete the main job details so healthcare professionals can quickly understand whether the role is relevant to them.
Employment Type
Choose the employment arrangement for the role.
Examples include:
– Full-time
– Part-time
– Casual
– Contract
– Locum
– On-call
This helps healthcare professionals identify roles that match their availability, career stage, and preferred working arrangement.
Work Arrangement
Select how the role is delivered.
Examples include:
– On-site
– Hybrid
– Remote
This helps set clear expectations before applicants click through or apply.
Job Link
Enter the external application URL if candidates should apply outside Med CPD.
This may include:
– Your careers page
– A Seek listing
– An internal HR application portal
– A recruitment platform listing
Before adding the link, check that it:
– Is active
– Starts with https://
– Opens the correct application page
– Is publicly accessible to applicants
A clear application pathway reduces confusion and helps interested healthcare professionals take the next step.
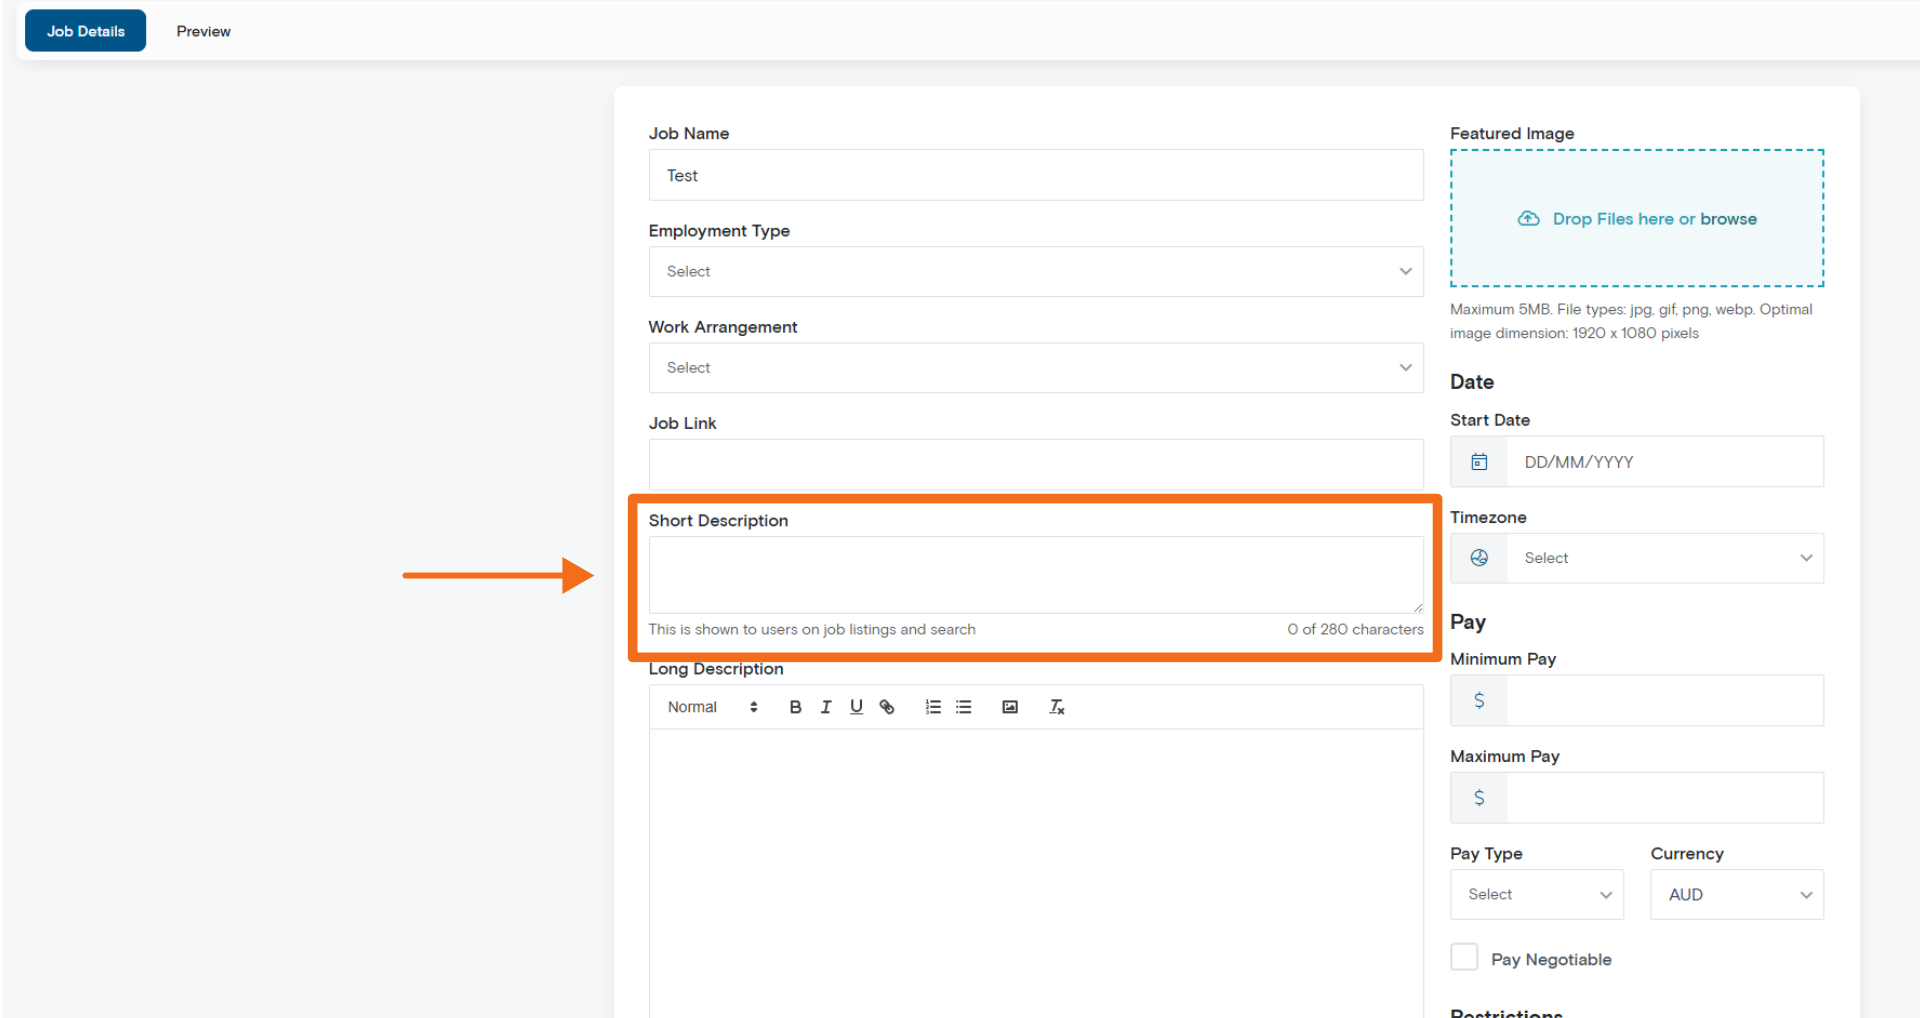
Step 4: Write the Short Description
The Short Description appears in job listings and search results.
Use this section to summarise the role in a clear and concise way. You have up to 280 characters.
A strong short description should include:
– The role type
– The key location
– The main benefit, opportunity, or point of difference
Example
Experienced GP required for a mixed billing clinic in Brisbane, with flexible hours, strong nursing support, and a supportive clinical team.
Keep this section easy to scan. Avoid trying to include every detail here. The full role information should go in the Long Description.
Step 5: Write the Long Description
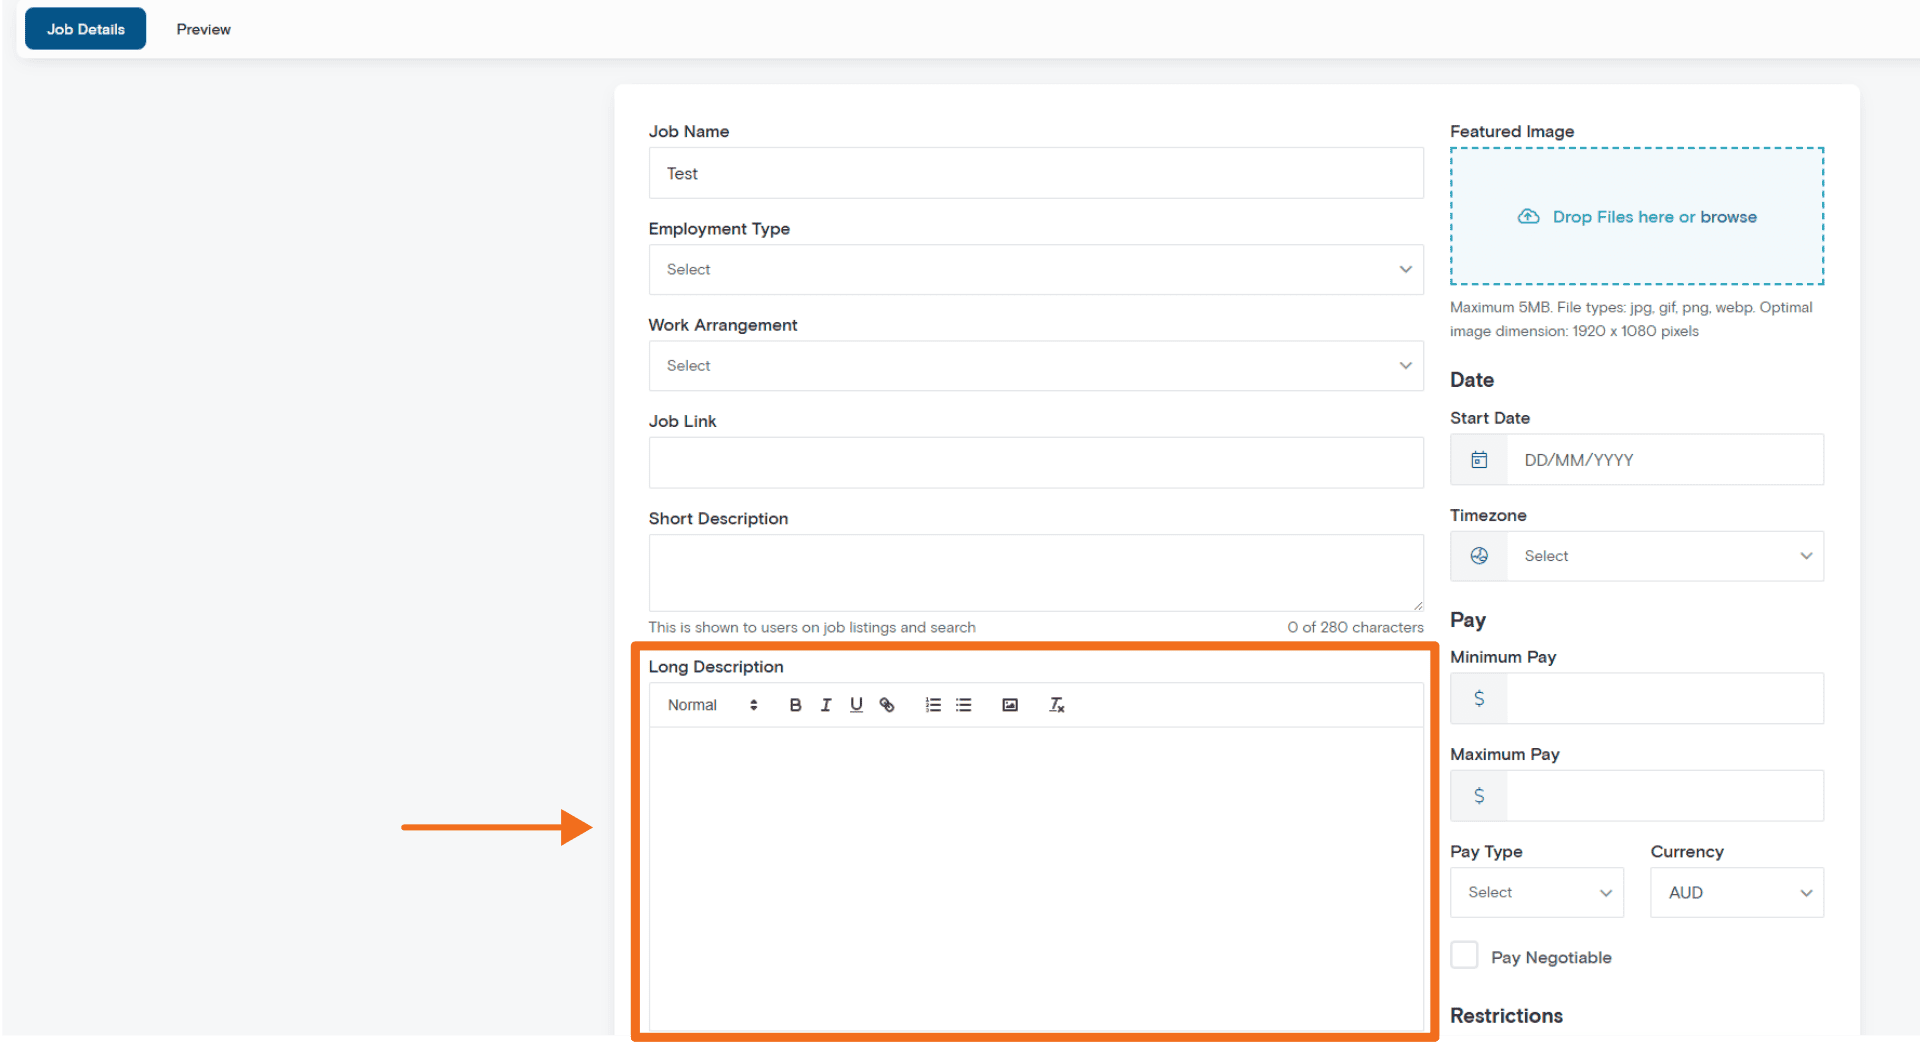
The Long Description is the main body of your job advertisement.
Use this section to provide the detail healthcare professionals need to decide whether the role is suitable.
A clear long description helps applicants understand the role, assess fit, and decide whether to apply. It can also reduce avoidable enquiries from applicants who are not suited to the position.
Recommended Structure
About the Role
Briefly explain:
– The position
– The workplace or team environment
– The organisation, practice, clinic, hospital, or service
– The type of patients, clients, or service setting
Key Responsibilities
Use bullet points where possible.
Examples may include:
– Deliver patient-centred care
– Work collaboratively with a multidisciplinary team
– Maintain accurate clinical documentation
– Participate in quality improvement or service development
– Support continuity of care for patients or clients
Skills, Qualifications, and Registration
Include any required or preferred criteria, such as:
– Required professional registration
– AHPRA registration, where applicable
– Experience level
– Clinical skills or areas of practice
– Preferred qualifications
– Credentialing or compliance requirements
Benefits and Workplace Culture
Include relevant benefits such as:
– Flexible roster
– CPD support
– Competitive remuneration
– Supportive workplace culture
– Supervision or mentoring
– Established patient base
– Administrative or nursing support
Application Information
Explain:
– How to apply
– Whether applications are through an external link
– Closing dates, if applicable
– Contact information, if appropriate
Writing Tips
Keep the description professional, specific, and easy to read.
Use:
– Short paragraphs
– Clear headings
– Bullet points
– Plain language
– Specific role details
Avoid:
– Large blocks of text
– Generic claims without detail
– Unclear salary or location information
– Overly promotional language
Step 6: Improve Job Discovery with Profession, Fields, and Topics
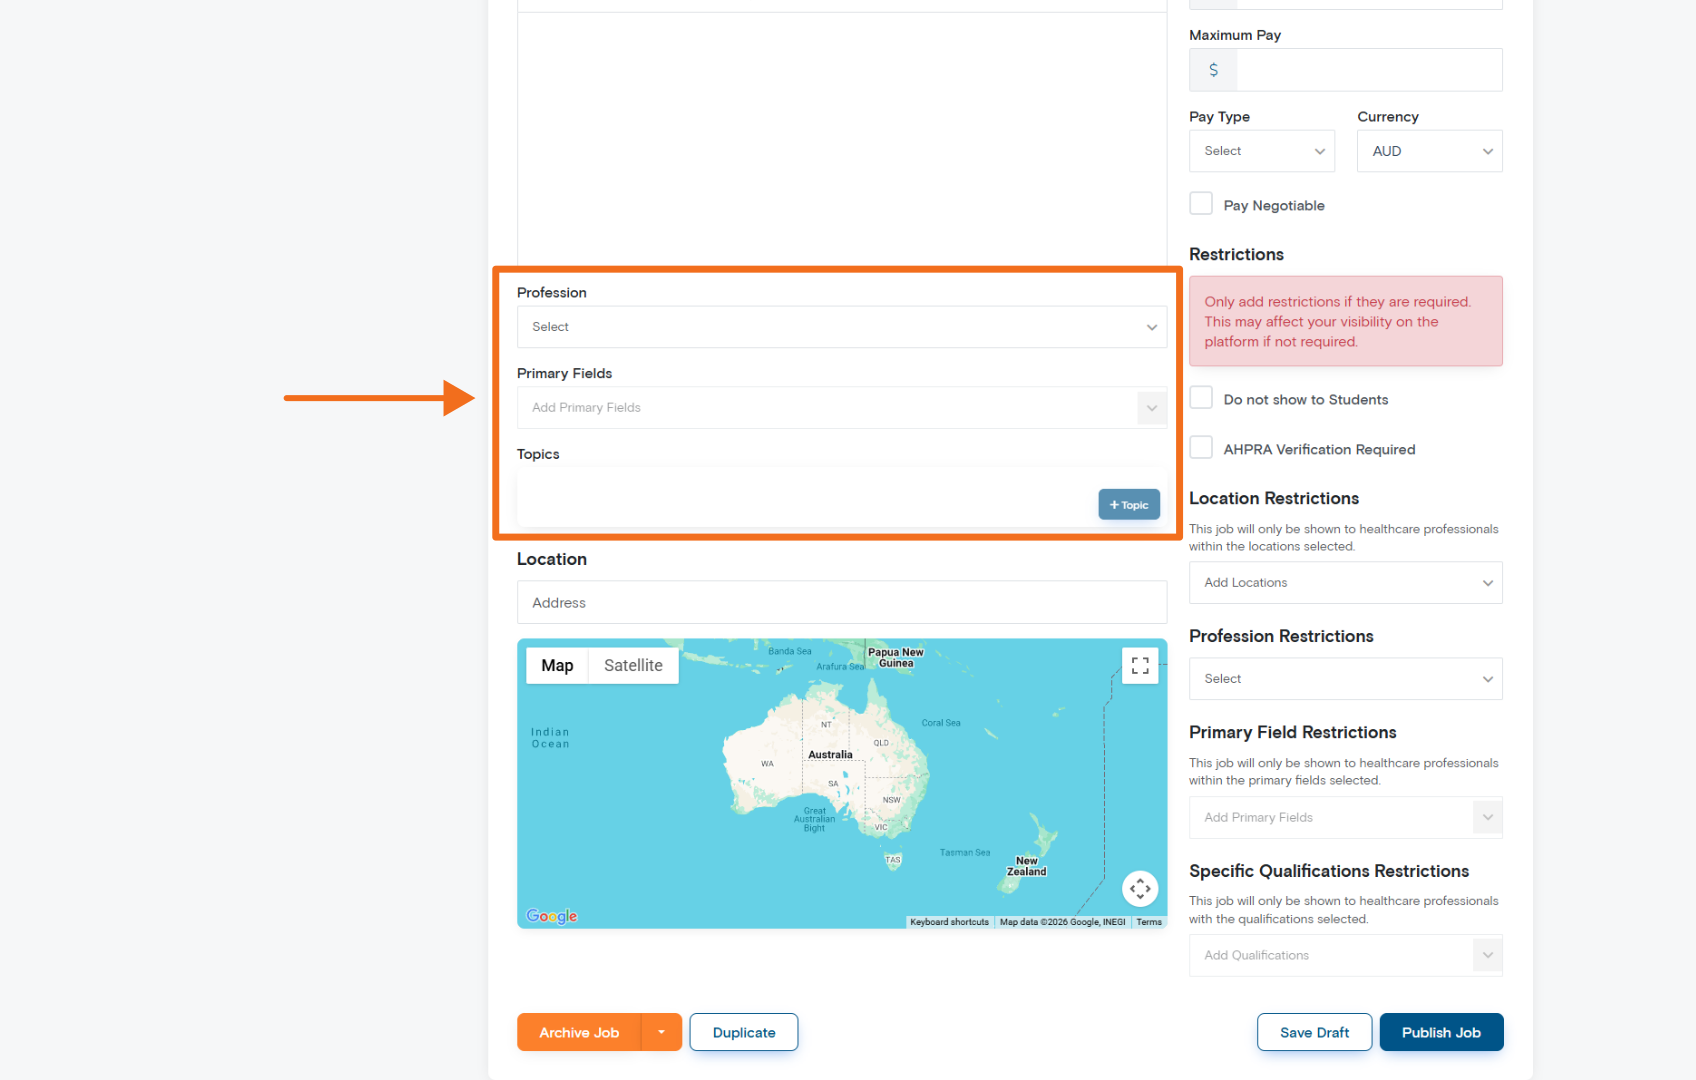
Profession, Primary Fields, and Topics help Med CPD categorise your job listing and improve discovery by relevant healthcare professionals.
These fields are important because they help users find roles that match their profession, interests, scope of practice, and career goals.
Profession
Choose the healthcare profession most relevant to the role.
Examples may include:
– General Practitioner
– Nurse
– Pharmacist
– Physiotherapist
– Psychologist
– Occupational Therapist
– Allied Health
– Disability Support
– Aged Care
Select the most accurate profession wherever possible. This helps your listing appear in front of users who are more likely to be suitable.
Primary Fields
Primary Fields help further categorise the role.
These may represent:
– Clinical specialties
– Areas of practice
– Service types
– Professional focus areas
Accurate fields improve the relevance of your listing and help healthcare professionals understand the type of work involved.
Topics
Topics allow you to tag additional areas related to the role.
Examples may include:
– Chronic disease management
– Emergency medicine
– Rural health
– Mental health
– Aged care
– Disability care
– Preventive health
– Women’s health
Use topics that are genuinely relevant to the role. Avoid adding unrelated topics, as this can reduce trust and lead to poorer applicant fit.
Step 7: Upload a Featured Image
The featured image appears alongside your job listing.
A professional, relevant image can improve trust and engagement with your listing. It also helps your organisation present itself clearly to healthcare professionals who may be viewing your role for the first time.
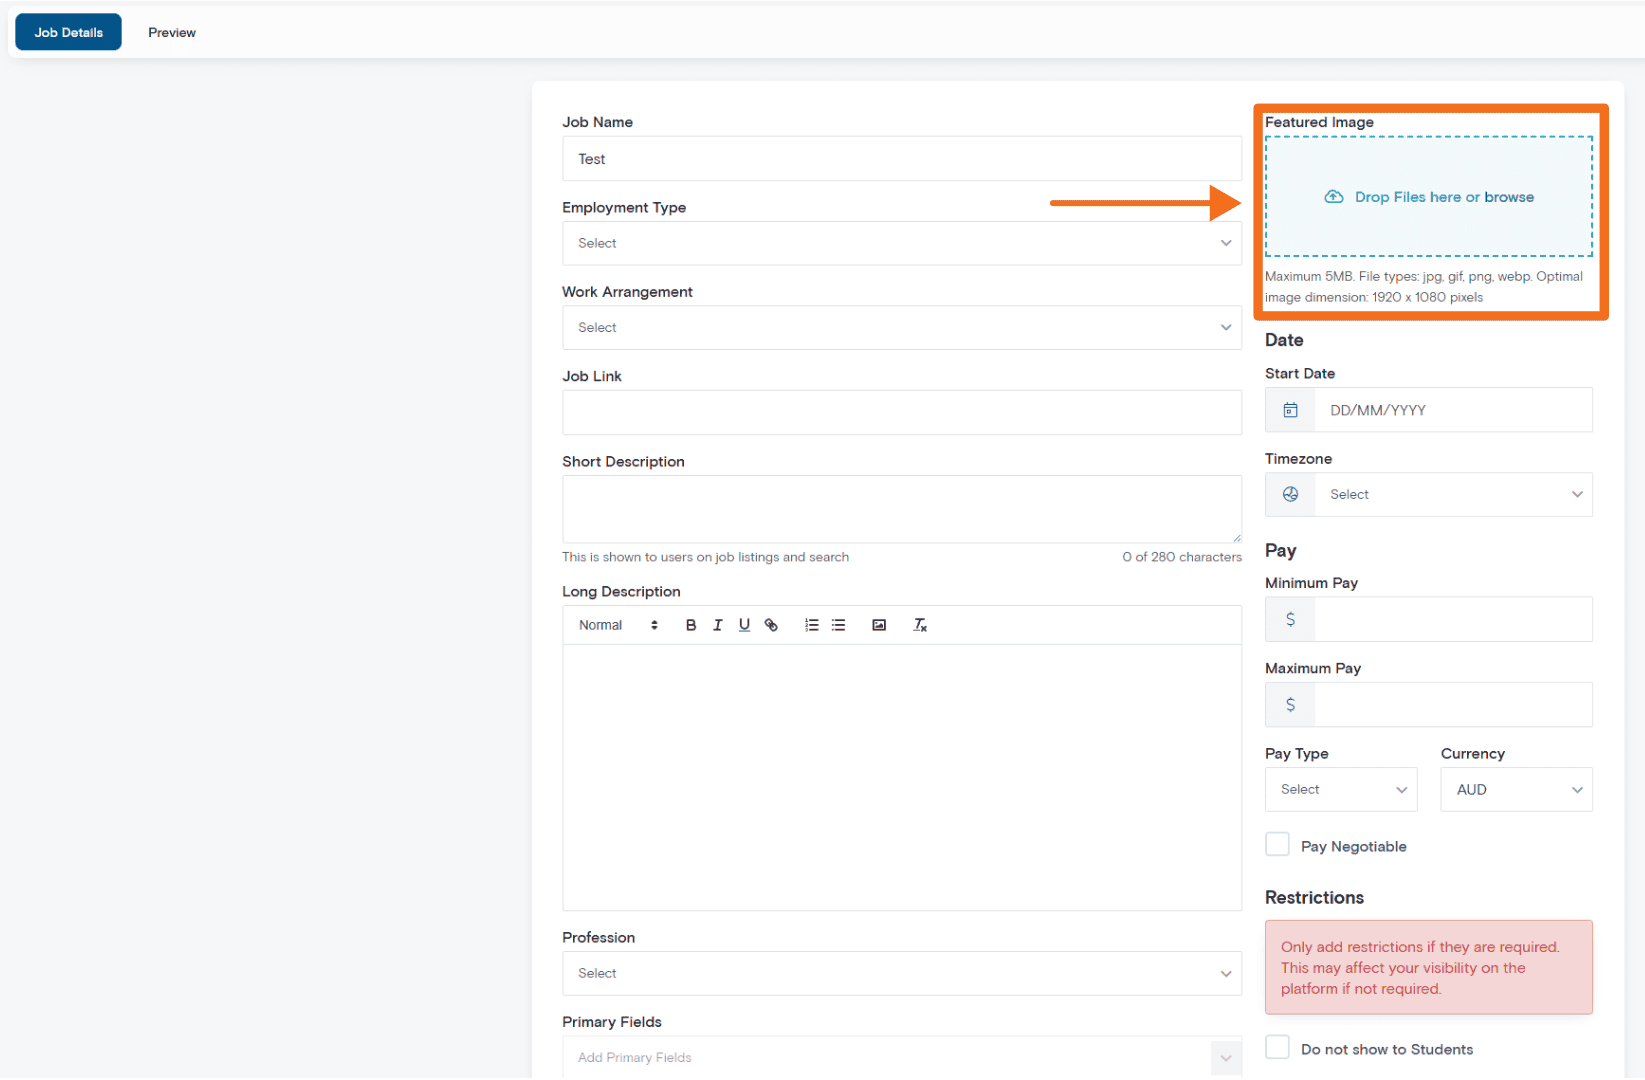
Image Requirements
– Maximum file size: 5MB
– Accepted formats: JPG, GIF, PNG
– Recommended size: 1920 × 1080 pixels
Best Practice Tips
Use:
– Professional workplace imagery
– Team or clinic photos
– Clean branded graphics
– Relevant healthcare or practice imagery
Avoid:
– Low-resolution images
– Text-heavy graphics
– Irrelevant stock photos
– Images that do not reflect the role or workplace
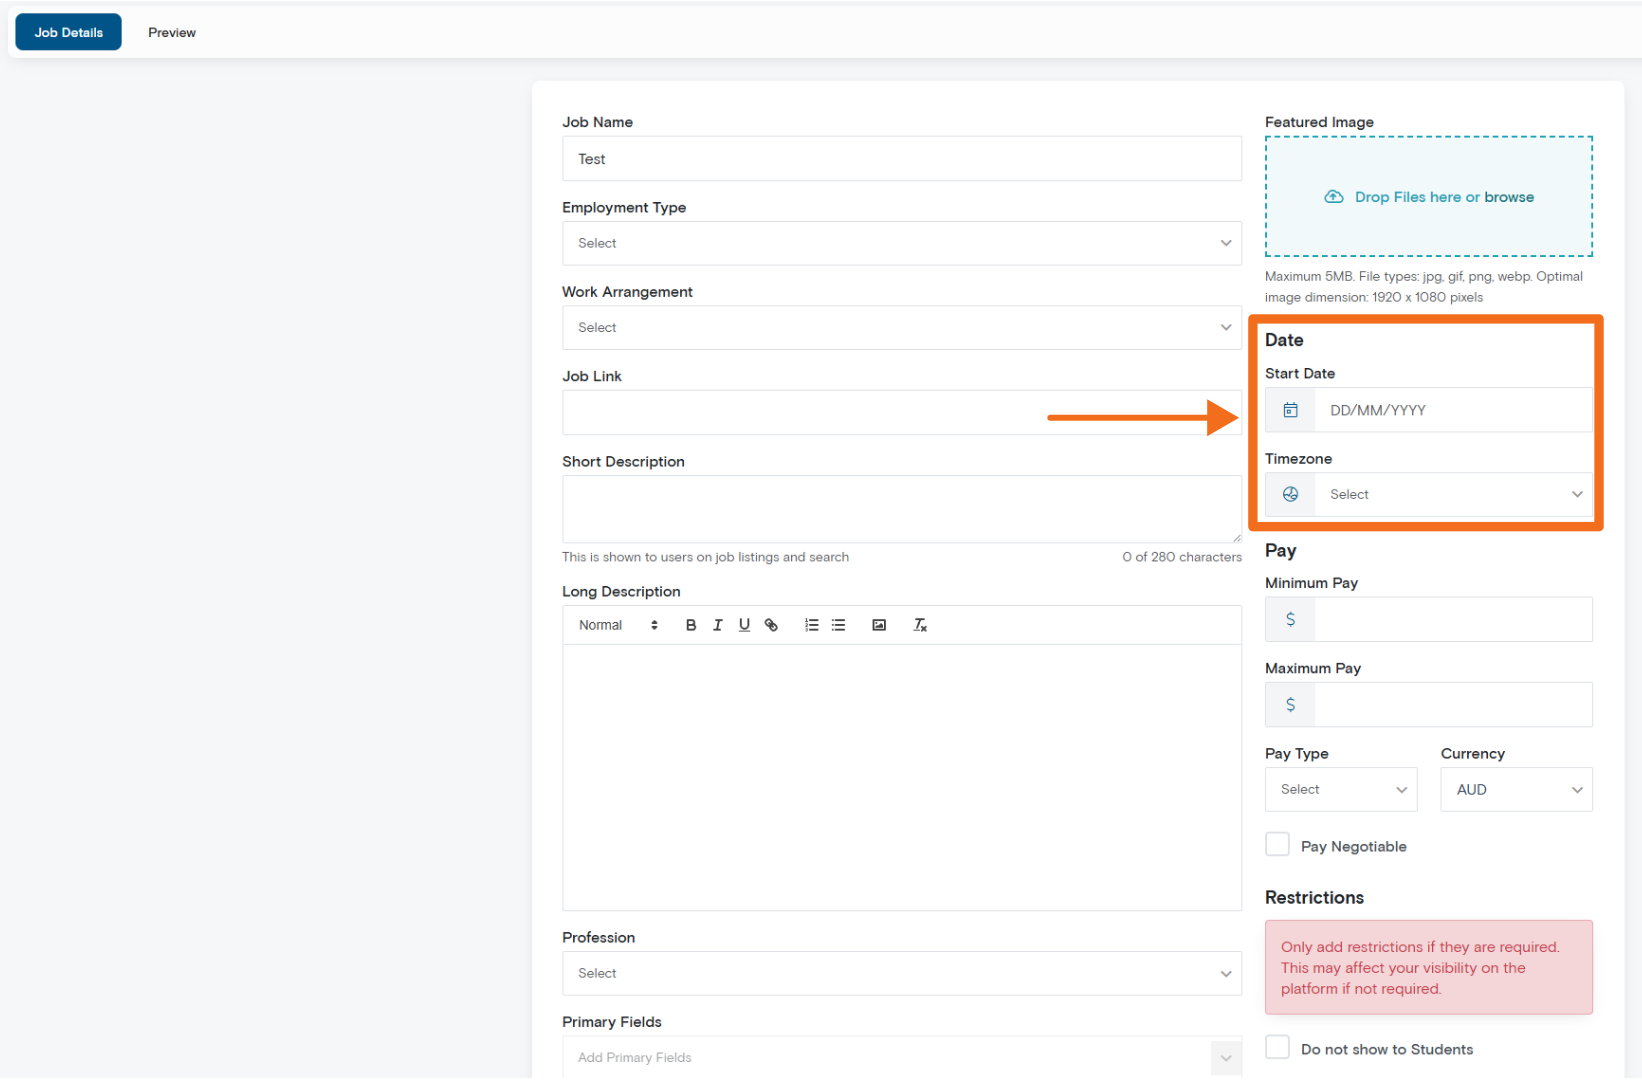
Step 8: Set Timing and Timezone
Start Date
Choose when the job listing should become active.
This is useful for:
– Future recruitment campaigns
– Scheduled hiring periods
– Coordinated advertising launches
– Roles that should not appear immediately
Timezone
Select the appropriate timezone for the listing.
This helps ensure dates and scheduling display correctly for users viewing the role.
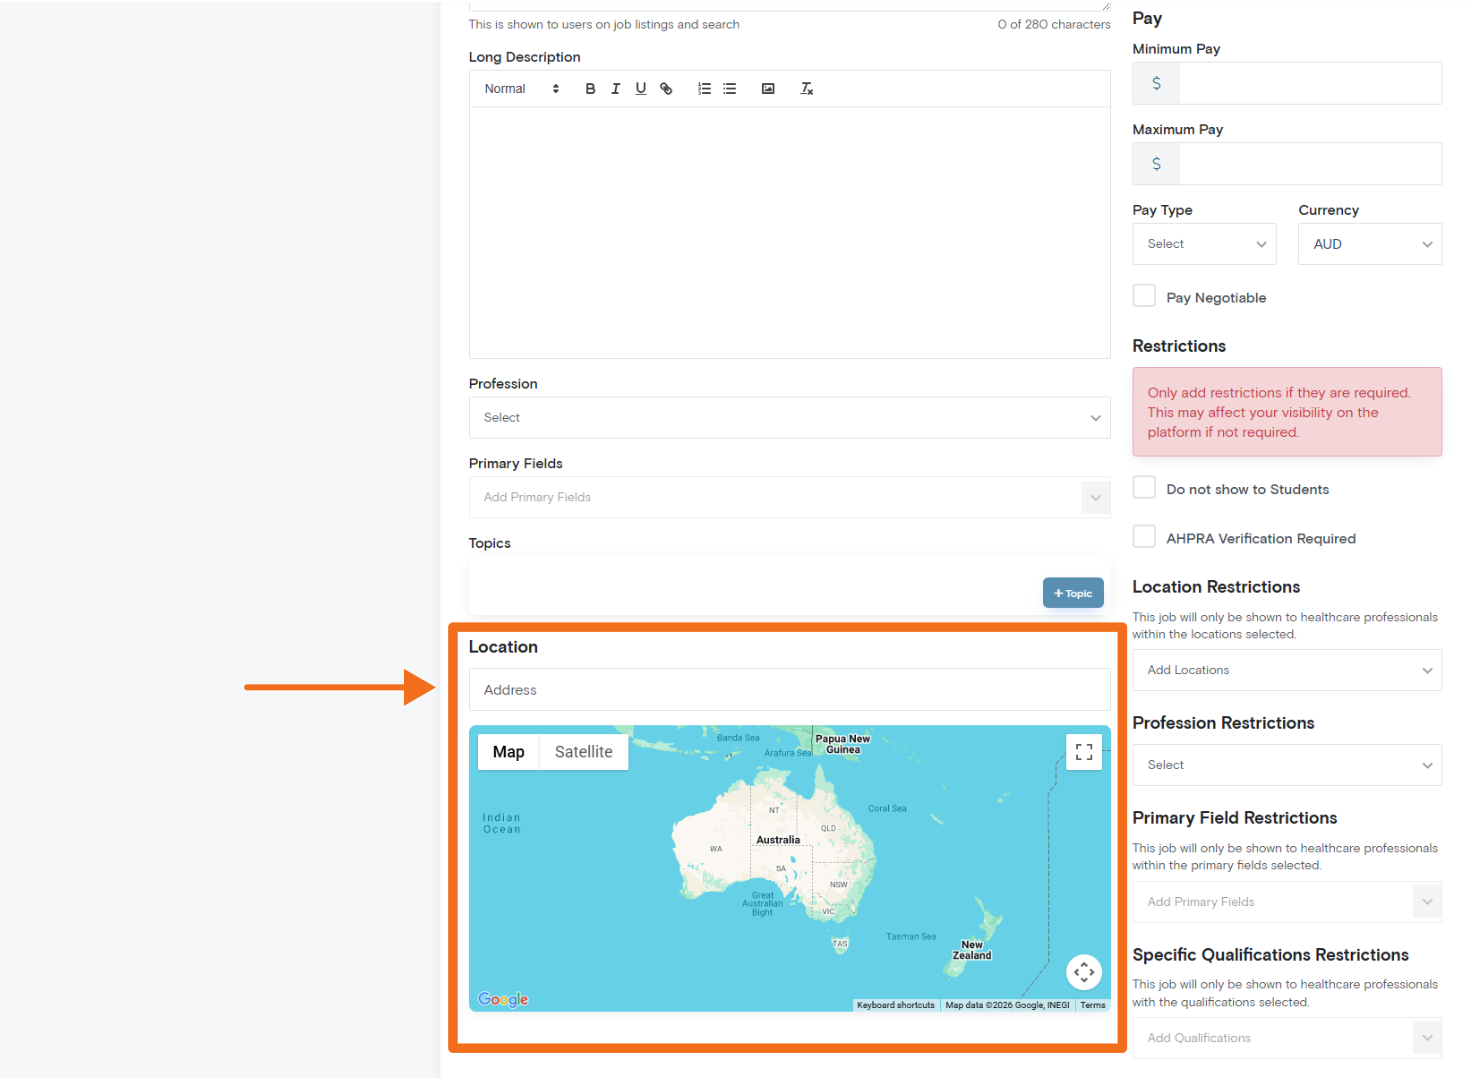
Step 9: Add Location Information
Enter the job location in the address field.
The map will update automatically based on the selected location.
Clear location information helps applicants assess commute, region, and suitability.
Tips
– Use a complete address where possible
– Check that the map location is accurate
– Use the main practice, clinic, hospital, or workplace address
– For remote roles, consider adding the organisation’s main office location if relevant
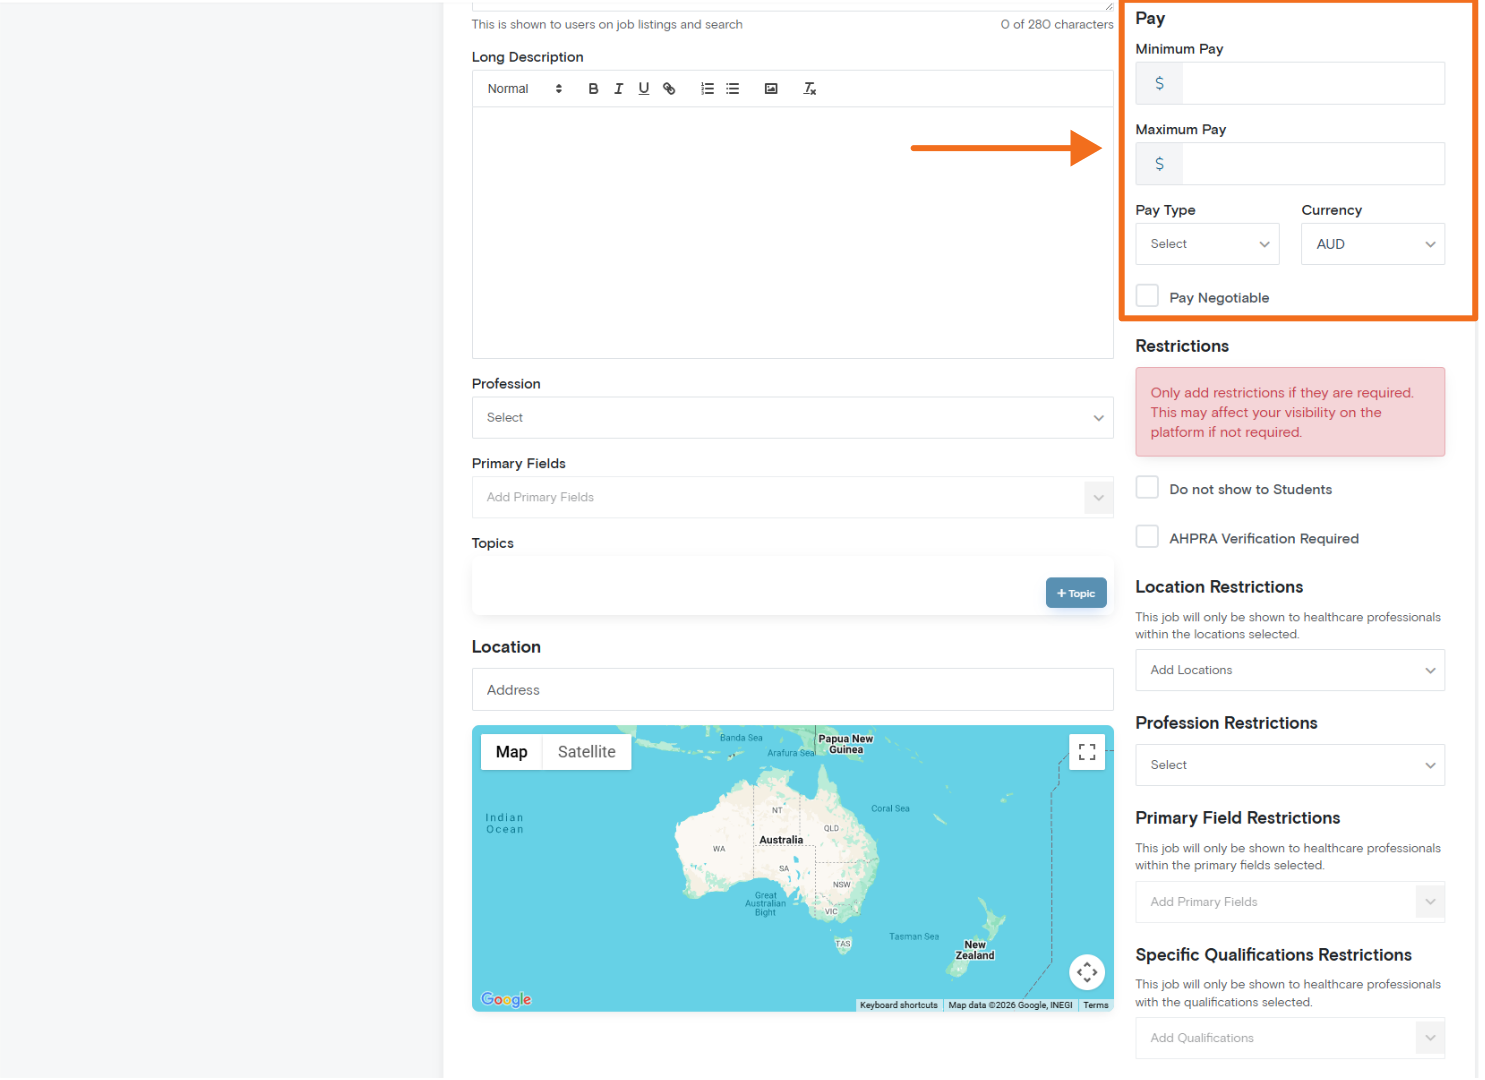
Step 10: Add Pay Information to Improve Transparency
Adding salary or pay information can improve transparency and candidate interest.
Many healthcare professionals use pay information to assess whether a role is suitable before applying. Where possible, include realistic and accurate pay details.
You can configure:
-Minimum pay
– Maximum pay
– Pay type
– Currency
– Negotiable pay
Pay Types
Available pay types include:
– Per Hour
– Per Annum
Tips
Use realistic pay ranges and make sure they align with the employment type.
For example, a casual or locum role may be better listed as an hourly rate, while a permanent full-time role may be better listed as an annual salary.
If remuneration depends on experience, workload, billings, or negotiation, use the negotiable pay option where appropriate.
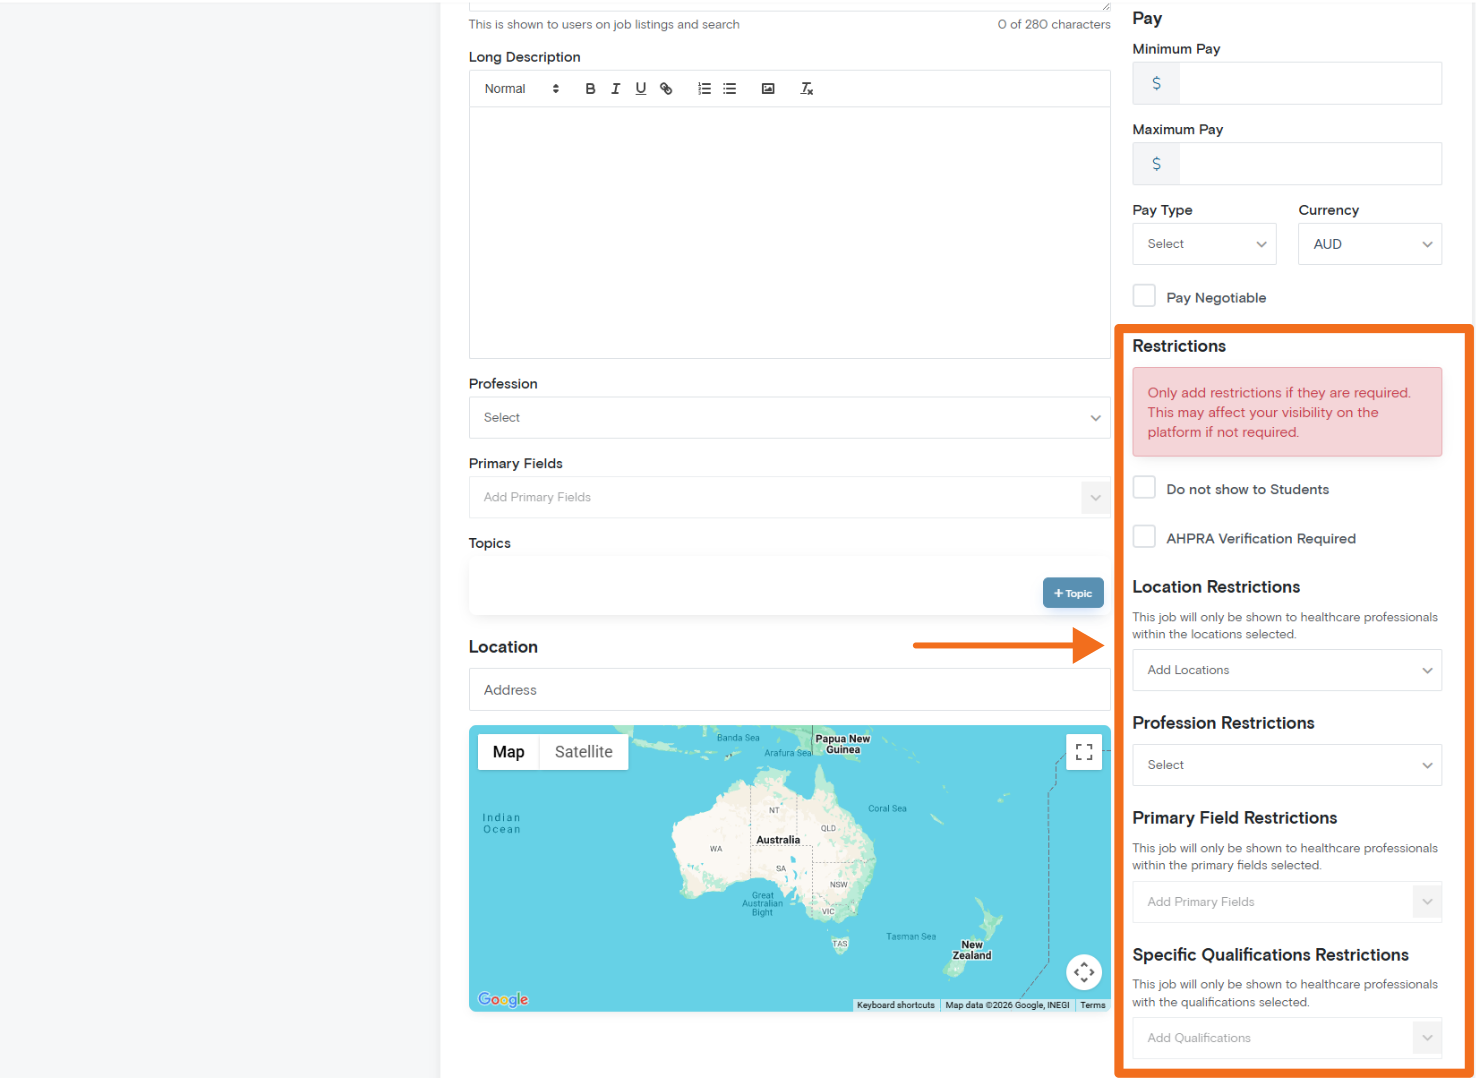
Step 11: Configure Visibility and Applicant Fit
Restrictions help target your listing to specific healthcare professionals.
Use restrictions carefully. They are useful when a role genuinely requires a specific location, profession, registration, qualification, or area of practice. However, over-restricting a job may prevent otherwise suitable healthcare professionals from seeing it.
The best approach is to use restrictions to improve applicant fit, not simply to narrow visibility.
You can restrict by:
– Location
– Profession
– Primary Fields
– Qualifications
Student Visibility
Enable Do not show to Students if the role is not suitable for students.
Leave this unchecked if students may apply, enquire, or benefit from viewing the role.
Examples where student visibility may be appropriate include:
– Graduate roles
– Assistant roles
– Entry-level healthcare roles
– Placement-linked opportunities
– Career pathway opportunities
AHPRA Verification Requirement
Enable AHPRA Verification Required only when applicants must hold current AHPRA registration.
This may be appropriate for many regulated healthcare roles, such as:
– Medical practitioners
– Nurses
– Pharmacists
– Physiotherapists
– Psychologists
– Occupational therapists
– Other AHPRA-regulated professions
Do not enable this setting for roles where AHPRA registration is not required.
This may include some:
– Administrative roles
– Education roles
– Support roles
– Disability or aged care roles
– Non-clinical roles
– Roles for non-AHPRA registered professionals
Step 12: Save Draft or Publish
At the bottom of the page, choose whether to save the job as a draft or publish it.
Save Draft
Use Save Draft if:
– The listing is incomplete
– You are waiting for internal approval
– You need to confirm salary or application details
– You want to return to the listing later
Publish Job
Select Publish Job when the listing is ready to go live.
Before publishing, check that:
– The job title is clear
– The short description is concise
– The long description is complete and well formatted
– The application link works
– The employment type and work arrangement are correct
– Salary or pay information is accurate
– Profession, fields, and topics are relevant
– Restrictions are appropriate
– The location and map are correct
– The image displays properly
You can also archive or delete your job post using the orange button in the bottom left.
Final Listing Review Checklist
Before publishing, ask:
– Would the right healthcare professional immediately understand this role?
– Is the job title specific and professional?
– Is the short description clear enough to encourage the right users to click?
– Does the long description explain the role, requirements, benefits, and application process?
– Are the profession, fields, and topics accurate?
– Have unnecessary restrictions been avoided?
– Is the application link correct and active?
– Is salary or pay information included where appropriate?
– Is the location clear and accurate?
– Does the listing present the organisation professionally?
A strong job listing should make it easy for suitable healthcare professionals to understand the opportunity and take the next step.
Tips for Better Job Listings
Use Clear Job Titles
Healthcare professionals often scan listings quickly. Clear job titles improve engagement and help users understand the role immediately.
Be Specific
Include enough detail for applicants to understand the role, workplace, expectations, and application process.
Be Transparent
Where possible, include:
– Salary or pay range
– Employment type
– Location
– Work arrangement
– Required registration
– Key responsibilities
– Application process
Keep Descriptions Structured
Use headings, bullet points, and short paragraphs. This makes your listing easier to read and more likely to be acted on.
Avoid Over-Restricting Visibility
Restrictions should only be used when they are genuinely required. Too many restrictions may reduce the number of suitable professionals who can see the role.
Use Professional Images
Relevant, high-quality imagery can improve trust and click-through rates. Use images that reflect your organisation, team, workplace, or professional brand.
Troubleshooting
My job is not visible
Check:
– The job has been published
– The listing is not still saved as a draft
– The start date has arrived
– Restrictions are not too narrow
– The correct profession has been selected
– The location settings are correct
My image will not upload
Check:
– The file size is under 5MB
– The file format is JPG, GIF, or PNG
– The image is not corrupted
– The image dimensions are suitable
Candidates cannot apply
Check:
– The job link is correct
– The URL is active
– The link starts with https://
– The application page is publicly accessible
– The external listing or HR portal is still live
Need Help?
If you experience issues creating or publishing a job listing, contact the Med CPD support team for assistance.
support@medcpd.com
Share to: